Monday, August 26, 2013

RUFFLE CORSET CAKE


After summer vacations is hard to start working but there is nothing better than a good project to put your hands on. I was asked to create a wedding cake but they wanted two things in the design: not traditional and colorful cake. Great!!! I love colors and textures  so I wanted to created a cake full of color but also full of movement, something vibrant and at the same time something sexy.

Después de las vacaciones volver al trabajo es difícil pero no hay nada más motivante que un buen proyecto. Me pidieron crear una tarta de boda con dos elementos fundamentales en el diseño: uno que  fuera algo distinto y no típico tradicional y la otra premisa es que tuviera mucho color. Genial!! a mi  me encantan los colores y las texturas, por eso decidí crear un diseño lleno de color pero también quería que tuviera movimiento, algo brivante y al mismo tiempo con un toque sexy.


With the Green range of colors I wanted to reflect that the cake is alive and transmit good feeling and good vibrations.
La gama de los verdes le da un toque de vida que transmite buen rollito y buenas vibraciones.


Thank you Sarah!! .
 Thank you for reading me and I really hope you liked too!! see you in my next post!! xoxoxox

Gracias Sarah!!!
 Espero que os guste a vosotros también!!. Gracias de nuevo por leerme y espero veros en el próximo post !! besos


Thanks for sharing this on Pinterest, Facebook, 
your blog, etc. and link back to Makememycake !!!! If you want to receive my posts in your mailing join us!!
 
Gracias por compartir en Pinterest, Facebook, vuestro blog o donde queráis poniendo el link de vuelta a Makememycake!!!! Si quieres recibir mis post en tu email simplemente unete a nosotros!!!


Tuesday, August 20, 2013

IT'S SMALL WORLD CUPCAKES!!!

                           Small World of Cupcakes Part I

Welcome back from the vacations!! This year I took vacations...wow....amazing feeling!! time to rest, time to share, time to think and time to create and no matter where, my mind is always working. As this year I went to Spain for vacations it made me thing how different we are in each part of the globe although at the end we are all the same and we all want the same things. With this idea I wanted to create my own small world of cupcakes inspired in the Disney creation. Two cupcakes with one personality, two cupcakes with the country identity but at the end all of them are two cupcakes...what a philosophical idea lol!!

Ya de vuelta de vacaciones, bienvenidos a todos!! Este año he cogido vacaciones...un logro y una increíble sensación!!! Es increíble tener tiempo, algo tan valioso, tiempo para descansar, para compartir, para pensar y sobre todo para crear, porque no importa donde mi cabeza está siempre funcionando. Este año he estado en España y siempre pienso lo diferentes que somos en cada parte del mundo aunque en el fondo todos terminamos queriendo las mismas cosas. Y con esta idea se me ocurrió crear mi propio "small world" o pequeño mundo inspirado en la creación de Disney. Dos cupcakes con una personalidad, dos cupcakes con una identidad de su propio país pero al final todos ellos son dos cupcakes...qué filosófica madre mía!!


With this idea I created a serie of different parts of Small World of cupcakes where I will be showing you the different countries of the world made in cupcakes.

Con esta idea he creado una serie de distintas partes de pequeños mundos de cupcakes donde iré mostrando los distintos países plasmados en cupcakes.


From left to right of the picture we have Uk. There are many possibilities of represent UK but I just chose the first thing that came to my mind.

De izquierda a derecha de la foto tenemos Reino Unido. Hay muchas posibilidades para representar los distintos países yo simplemente me dejé llevar por la primera idea que me vino a la cabeza.


France oh la la...sophisticated and fashionable inspired in Coco.
Francia Oh la la...sofisticada y fashion inspirada in Coco.

 
Spain, what I can say!! I enjoyed making this one because I feel it....ole, ole and Ole
España que voy a decir, disfruté mucho haciédola porque me llega...ole, ole y ole.


I know that Africa is not a country but in my mind this cupcake represents Africa. I really love this one!!!

Ya sé que Africa no es un país pero creo que para mi este cupcake representa bien Africa. Este es uno de mis favoritos!!


China in the most traditional style!! She is cute!!
China en la forma más tradicional...es super graciosa!!!

And the last one of this Part I USA. This one is a mix of ideas in one and it´s so nice too.
Y la última de esta primera parte, Estados Unidos. Este es una mezcla de ideas en uno y muy mono también.
To make these cupcakes you will need some cupcakes and fondant in different colors. For the cupcakes I used this recipe:

Orange Cupcakes:

1 cup unsalted butter
3 extra large eggs
1 cup superfine sugar
1 orange finely grated
1/4 poppy seeds
2 1/4 cups all-purpose flour
2 tsp baking powder
2/3 cup milk whole
2/3 cup orange juice

Preheat the oven to 325 F.
Beat the butter and sugar all together until pale and fluffy. Then add eggs gradually. Stir in the orange rind and poppy seeds. Sift in the flour and baking powder and then mix all ingredients together.
Add the milk and orange juice and mix again.
Divide batter among baking cups, filling each cup 3/4 full. Bake in preheated oven 21 - 24 minutes, rotating cupcake tin once halfway through baking, until toothpick inserted into center comes out clean. Remove from oven and allow to cool several minutes before transferring to a wire rack to cool
One you have the cupcakes completely cold they are ready to be transformed in this wonderful small world.

 
I really hope that you liked my Small World of cupcakes!!

Espero que os haya gustado mi Pequeño Mundo de cupcakes!!!


Thank you so much for stopping by and hope to see you in my next post....Small World cupcakes Part II will be posted soon!!

Muchas gracias por leer este blog y espero veros en mi próximo post....muy pronto Small World cupcakes Parte II!!!


I really would love to hear your comments. Which one do you like the most??? Do you have any suggestion for me to make in the following parts?? any country??? All ideas will be welcome!!

Me encantaría saber vuestra opinión. Cuál os ha gustado más? Tenéis alguna sugerencia para que haga en las próximas ediciones? Algún país en concreto?? Todas las ideas serán bien recibidas!!!


Thanks for sharing this on Pinterest, Facebook, 
your blog, etc. and link back to Makememycake !!!! If you want to receive my posts in your mailing join us!!


Gracias por compartir en Pinterest, Facebook, vuestro blog o donde queráis poniendo el link de vuelta a Makememycake!!!! Si quieres recibir mis post en tu email simplemente unete a nosotros!!!


Tuesday, June 18, 2013

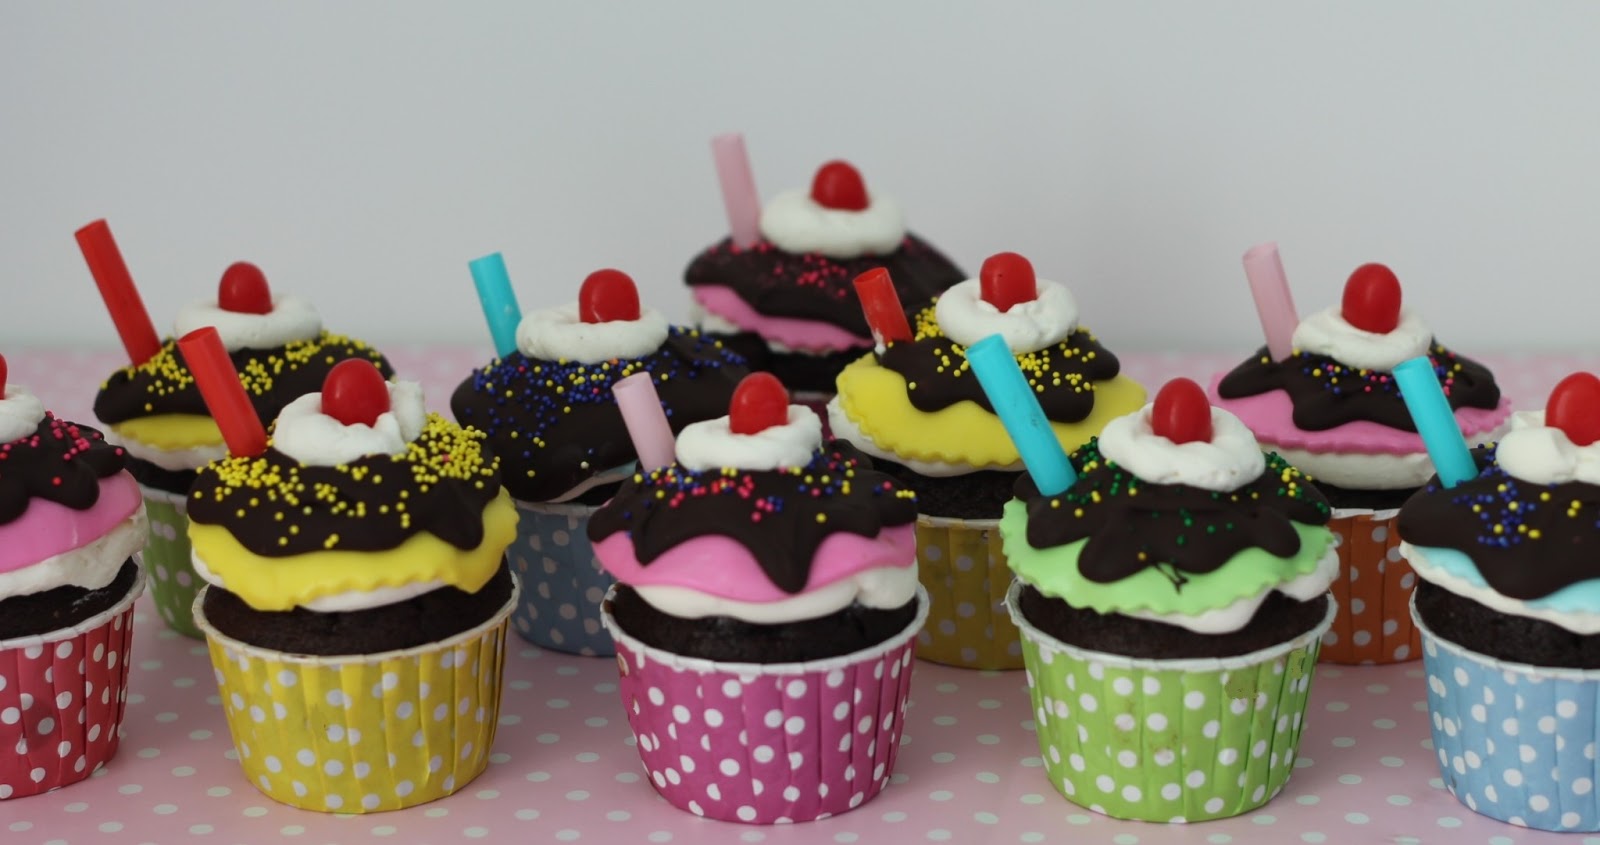
SUNDAY CUPCAKES AND POPCORN CUPCAKES

                                               SUNDAES FOR FUN DAYS

This time I had a special request because it was my 5 years old son who asked me to make some special cupcakes.  He had to bring  cupcakes to the school but they had to be top cupcakes, imaging one year talking to his class about his "wonderful baking mom"  so they couldn't be as simple as cupcake plus buttercream....glup glup...now what I do???!!!! so he helped me a lot suggesting that for the boys we could make pop corns cupcakes and for the girls sundaes...why? good question...so since then I learned that cupcakes have also gender, oh yeah ;)

Esta ocasión ha sido un tanto especial porque es mi hijo de 5 años el que tenía que llevar cupcakes a su cole,  y claro aquí viene el momento de presión en el que mi niño lleva un año hablando de las maravillas "reposteriles" que hace su mami y no puede aparecer con unos simples cupcakes con un pegote de buttercream...no. Entonces llega ese momento en el que me quedo en blanco y digo ahora que le mando yo!!! pero bueno creo él que es muy resuelto resolvio mi duda decidiendo que las palomitas serían para los niños y los helados para las niñas...por qué?? buena pregunta....desde entonces he aprendido que los cupcakes tienen genero, si si ;)


These cupcakes are so funny because you don´t know if bite them or drink them!! in both cases they make any table sooooooo colorful!!

Estos cupcakes son super divertidos porque no sabes si moder o beber, en ambos casos resultan un elemento super colorido para cualquier mesa de cualquier evento.


We would need our cupakes of course!!!

Necesitaremos cupcakes por supuesto!!

 Mini Marshmallows

Nubes de tamaño pequeño


 Chocolate chips to melt.

Pepitas de chocolate para derretir

I used red jelly beans to put on top of the sundae cupcakes but you can use any candy that you like.

Para la guinda del helado utilice los caramelos jelly beans rojos pero podéis utilizar cualquier otro que os guste y sea más fácil de conseguir.

For both type of cupcakes you have to cover the cupcakes with buttercream and then add the decoration. For the popcorn cupcakes its so easy, just take the mini marshmallow, cut in half and twist the half sides and stick again making the shape of a perfect popcorn. 

En ambos tipos de cupcakes hay que cubrirlos con buttercream y encima del buttercream añadir las decoraciones. En el caso de las palomitas es muy fácil. Cogemos la nube pequeña, la cortamos por la mitad, la retorcemos sobre si misma y vovemos a pegar las dos mitades dándole forma de palomita


Attach the marshmallows pop corns to the buttercream. To make them more realistic we apply with a brush some "Buttercup petal dust" and in the centers some brown edible gel.

Se van pegando las nubes en forma de palomitas al buttercream y para hacerlas más reales se aplica con un pincel un poco de petal dust del color Buttercup. En los centros se puede también aplicar un poco de gel marrón comestible.


Once we have ready, we can keep in the fridge for a while.

Una vez listos, los podemos guardar en la nevera.

.


To make the sundae cupcakes we also need to cover them with buttercream but in this case is nice to see a little bit of the cupcakes which is chocolate and makes a nice contrast. 

Para hacer los cupcakes de helado necesitamos ponerles buttercream pero en este caso si queda bonito que se vea el cupcake debajo ya que crea un bonito contraste de colores.


We cut a fondant circle in the color that we want and attach it to the buttercream. We melt the chocolate chips in the microwave and split over the cupcake.

Cortamos un círculo de fondant en el color que vayamos a poner. Derretimos las pepitas de chocolate en el microondas y lo ponemos encima del cupcakes dejando que se derrame un poco sin llegar a caer del todo.


We add some nice sprinkles which makes the cupcakes soooo yummmy!!!

Añadimos las bolitas o el topper que más nos guste por encima para darle un toque super dulce!!


We add some buttercream on top of the chocolate ganache to hold the red jelly bean and that´s it...a beautiful and colorful sundae cupcake. I also cut a straw and put in one side to make it more realistic.

Ponemos un poquito de buttercream encima del chocolate para que sujete el caramelo o guinda roja y listo...tenemos un cupcakes super colorido....me encanta!!! Para hacerlos más reales corte unas pajitas de colores y las puse a un lado del cupcake.

I don't know which one I like more...

No sé cuál me gusta más de los dos...


Sundaes or pop corns??????


ummmmmmhhhhhh.....I don't know

ummmmmhhh .....no sé , no sé

and the best thing is that they are not only so beautiful they are soooo yummmyy!!!

Y lo mejor no es que sean super bonitos, es que además están riquísimos!!!!


Both cupcakes are going to be the center of any celebrations so try to make it and you will see that not only kids will love them. I hope you liked it and please let me know which one you prefer....pop corns or sundaes??? sundaes or pop corns???

Tanto unos como otros serán el centro de cualquier celebración, ya sabéis probarlo y veréis que no sólo gustan a los más pequeños. Espero que os haya gustado y también espero que me digaís cuál de los dos os gusta más...las palomitas o los helados??? helados o palomitas?????


Thank you for stopping by and hope to see you in my next post. xoxoxoxo

Gracias por leerme y espero veros en mi próximo post. Besos


Thanks for sharing this on Pinterest, Facebook, 
your blog, etc. and link back to Makememycake !!!! If you want to receive my posts in your mailing join us!!

Gracias por compartir en Pinterest, Facebook, vuestro blog o donde queráis poniendo el link de vuelta a Makememycake!!!! Si quieres recibir mis post en tu email simplemente unete a nosotros!!!


Monday, June 10, 2013

HOW TO MAKE A MONSTER HIGH IN SUGAR

It's amazing how these dolls have become so  popular! My idea of a doll is more a Barbie or Nancy than this kind of vampire with green skin and strong make up and sooo insane skinny!!! At the beginning I have to confess that I did not like a lot but now I can even see the beauty in them...and in their white fangs always ready to bite lol!!

Es increíble como estas muñecas han llegado a ser tan populares. La verdad es que mi idea de muñeca se remonta más bien a una Barbie o incluso a Nancy que a estas vampiras con piel verde, maquillaje imposible y delgadez extrema!! Al principio confieso no me gustaban nada, pero oye ahora incluso las veo monas...y siempre con los colmillos listos para morder..jajaja


You may know already who is this one. Her name is Draculaura and she loves the throne that I made much better than those cold cofins.

Quizá ya conozcáis quien es esta monster high, su nombre es Draculaura y la verdad que le encanta el trono que le he hecho, mucho más a gustito  que esas tumbas húmedas y frías.


I used fondant mixed with tylose to make it a harder faster. My first step was to make a very clear skin color ball and with your hands make the shape that you want. Once we have the right shape I painted all the details with edible color mixed with lemon extract (you can use vodka too).

Para hacer la muñeca he usado fondant mezclado con un poco de Tylosa para que cogiera firmeza antes. El primer paso es hacer una bola del color elegido para la piel y con los dedos darle la forma que queramos. Con la forma dada empezamos con los detalles. Yo los pinte con colorante comestible en gel mezclado con extracto de limón (también se puede utilizar vodka).


We draw eyes and mark the nose.

Dibujamos los ojos y marcamos la nariz.


Mouth and color inside.

La boca y coloreamos dentro

On top of the head we put a little black fondant rope to make the hair as you can see on the picture and we go putting all the stripes around it. We add the fringe.

Ponemos una tira de fondant negro para ir acoplando las tiras que hacen el peinado alrededor de la misma. Ponemos el flequillo.

When we have all the hair done we add a little important detail...the fangs!!!

Cuando tenemos el pelo hecho añadimos un pequeño detalle muy importante...los colmillos!!!

To make the chair we need the following pieces and them we glue all together with edible glue or chocolate. We make the body of Draculaura and we put the head thought the stick and glue with edible glue.

Para hacer la silla podéis ver las piezas necesarias que pegada con pegamento comestible o bien con chocolate hacen la silla. Hacemos el cuerpo de la monster y ponemos un palillo que atraviese el cuerpo y será donde insertemos la cabeza que pegaremos con pegamento comestible para asegurarla y que no se mueva.


Now we have Draculaura in her chair but oh oh she needs her beautiful hair!!! this step is the last thing that you have to attach.

Ya tenemos a Draculaura sentada en su silla pero necesita ese pelo tan bonito y característico!! este paso es el último que tenemos que  tenemos que añadir.


And here we have the doll made out of fondant!!

Y esta es la muñeca terminada hecha con fondant!!


And this is the final cake with two coffins made out of cake too and the cake pops too.

Y esta es la tarta final con dos ataudes hechos en tarta también y los cake pops.

Hope you liked this Monster High themed post!! thank you for stopping by and see you in my next post. xoxoxox

Espero que os haya gustado este post temático de las monster High. Gracias por leerlo y espero veros en mi próximo post. Besos

Thanks for sharing this on Pinterest, Facebook, 
your blog, etc. and link back to Makememycake !!!!

Gracias por compartir en Pinterest, Facebook, vuestro blog o donde queráis poniendo el link de vuelta a Makememycake!!!!


Wednesday, May 29, 2013

HOW TO HAND PAINT A CAKE

HOW TO HAND PAINT A CAKE
I loooooove painting!!! It doesn't mean that I paint as well as I would like but I think that everybody must give it a try.  With this technique that I am going to explain you You don't need to be Picasso  but in this case the difficulty is double because I am painting  a white cake so you have to make it at the first time, there is no way to erase or to go back so  find a good position, good light and relax, don't think...just enjoy!!

Me encanta pintar!!! Esto no quiere decir que pinte tan bien como realmente me gustaría pero al igual que yo, creo que todo el mundo que le guste la pintura y además le gusten la decoración de tartas debería intentar. Con la técnica que os voy a explicar no se necesita ser Picasso, la dificultad añadida de esta técnica es la de pintar sobre un cake blanco. Ahí no hay error que valga, no hay forma de borrarlo ni de ir hacia atrás, tiene que ser a la primera, por eso es fundamental encontrar una buena postura, buena luz y sobre todo relajaros, no penséis simplemente disfrutar!!


The first thing that we need is to have ready our cake so we have to stack the two or three tiers or even four. The original design is from Sifted Bakery and it was made in three tiers which is really nice but as you can see two tiers cake is also nice.

Lo primero que tenemos que hacer es preparar nuestros cake montado y bien limpio. Puede ser con dos pisos o  tres, incluso cuatro. El diseño original que es de Sifted Bakery era de tres pisos y realmente precioso pero en dos como podréis ver también queda bien bonito.


For painting you have to use vodka or lemon extract to thin the edible color. Personally I prefer lemon extract because I love how smell it but you can use any of them.
The black color that I used was Spectrum black gel. The other colors that I used: Apple green petal dust and Turquoise petal dust. These dusts you don't need to mix with vodka, just apply like that directly.


Para pintar sobre un cake se usa vozka o extracto de limón para diluir la pintura comestible. Yo prefiero el extracto de limón porque me encanta como huele pero da igual uno que otro.
El negro que use fue gel negro de Spectrum y los otros colores que he aplicado son Apple Green petal dust y turquoise petal dust, estos dos últimos se aplican en polvo sin diluir.


 If painting is not your strong point the best thing that you can do is to make a template. I painted but you can print from the computer so you don't have to draw. Once you have your template you put on the cake and lightly hold it with thin pins as you can see in the picture. With the pin tool of the picture or just a pin you can mark on the cake the shape of the thing that you want to paint even over the template.

Si pintar no es vuestro punto fuerte lo mejor que podéis hacer es una plantilla. En este caso yo la dibuje pero lo podéis imprimir del ordenador y así ni si quiera hay que dibujar. Una vez que tenéis la plantilla de lo que queréis dibujar se pone sobre el cake y se sujeta con un alfiler finito como el de la foto. Para marcar el dibujo yo utilizo una herramienta que es buenísima pero si no la tenéis con un alfiler o algo afilado es suficiente, simplemente marcais el dibujo que queréis hacer. Incluso por encima del papel.


 Once you have marked the template on the cake, take out the template and follow the lines. I know that it is difficult because the cake is soooo white, but for me this is the best part, I don't have limits with a brush in my hand!!!

Ahora que tenemos marcada la plantilla sobre la superficie de nuestro cake, sólo tenemos que seguir las líneas. Claro que hay un poco de tensión y nervios para no equivocarnos porque el cake es muuuuy blanco, demasiado!!, pero para mi es el mejor momento, lo disfruto mucho y yo con un pincel en la mano soy un peligro, no tengo fin!!!

When you have the lines of the contour already painted just fill in everything inside. When we have all the black work done, we start to add colors, the green and the turquoise. In this case we apply the dust colors directly on the cake. 

Cuando esté la silueta ya marcada, podemos empezar a trabajar dentro de la misma e ir rellenando las líneas. Una vez terminado el negro, es el momento de aplicar el  verde y turquesa, que como os mencioné antes, se hace en polvo sin diluir y muy poco a poco.

The green and turquoise colors give to the cake a beautiful contrast.

El verde y el turquesa le dan un contraste super bonito.

The flowers are made out in fondant mixed with tylose 3 days in advance. I used circle cutter and ruffle the sides with a ball tool. I placed the petal one on top  of another one and separated with paper tower to hold the shape.

Las flores están hechas con fondant mezclado con tylosa 3 días antes. Utilice un cortador en forma de círculo para los petalos y con la herrmienta de bola rice los lados para que cogieran forma. Puse un petalo encima del otro y los separé con rollo de papel para que se secaran con la forma ondulada.

And you have the final result. You can make them bigger or smaller just adapt the circle cutter size to the size of the flower that you need.

Y este es el resultado final. Se pueden hacer más grandes o más pequeñas, sencillamente se utiliza el cortador en forma de cículo del tamaño que necesitéis para el tamaño de la flor.

I hope that from now you can use this technique to hand paint on the cakes and I invite you to share with me your results. If you have any question please let me know....hope you have enjoyed with this post !!! xoxoxo

Espero que a partir de ahora podais utilizar esta técnica para pintar a mano los cakes y os invito a que compartais aquí vuestros proyectos para ver qué tal se os ha dado. Si tenéis cualquier pregunta no dudeís en preguntar...espero que os haya gustado y espero veros en mi próximo post!!! Besos


Thanks for sharing this on Pinterest, Facebook, 
your blog, etc. and link back to Makememycake !!!! 


Gracias por compartir en Pinterest, Facebook, vuestro blog o donde queráis poniendo el link de vuelta a Makememycake!!!!